Next in the infrastructures.org checklist is host install tools. In a larger environment, this could include Microsoft’s Lite Touch or SCCM, Kickstart for Red Hat-based systems, or Preseed for Debian-based systems. At the university, we use Windows DHCP to manage PXE booting, an SCCM server for Windows installs, and a RHEL server for Kickstart supporting both RHEL and CentOS versions 6 and 7. Since Windows outnumbers Linux there, Kickstart requires that we make DHCP reservations for each Linux system and set DHCP options on each reservation pointing to the specific release we want to install. In this lab environment, we’ll simplify things to just CentOS 7, and can set that as the default PXE option for the entire network segment.
- The Basic Steps in PXE Booting
- Setting DHCP Options for the Subnet Using Bolt
- Setting up Puppet on the Puppet Server
- Applying a Roles and Profiles Structure to the Puppet Server
- Testing the Host Install Tools by Building a New Kickstart Server
- Cleaning Up the Puppet Server’s Roles
The Basic Steps in PXE Booting
Typically, a client booting with PXE goes through the following steps:
- The client makes a DHCP request.
- The DHCP server responds with the client’s IP and other settings defined in either the DHCP scope options or client reservation options.
- The client use the value in DHCP option 66 to identify a TFTP server, and the value in DHCP option 67 to identify the boot file on thE TFTP server.
- The client downloads and executes the boot file, and the rest of the process is controlled by the boot file.
So the simplest manual setup steps for an unattended CentOS installation in the lab environment would require:
- Setting DHCP options for the lab network segment, pointing options 66 and 67 to a designated TFTP server serving
pxelinux.0from the Syslinux project. - Installing TFTP on the designated server, and configuring it to allow TFTP traffic through its firewall.
- Copying
pxelinux.0and supporting boot configuration files to the TFTP directory. - Editing the boot configuration file to download a Kickstart configuration over http (which will require an additional installation of a web server and associated firewall rules).
We’ll attempt to set up each of these to be as automated as possible, using Bolt and Puppet.
Setting DHCP Options for the Subnet Using Bolt
Even though the DHCP options can be set with two PowerShell commands, and have few redundant settings between them, we’ll make a Bolt task to set them.
In Boltdir/site-modules/renfro/tasks/create_pxe_options.ps1, add:
[CmdletBinding(PositionalBinding=$false)]
param (
  [Parameter(Mandatory=$true)]
  [string]
  $scope,
  [Parameter(Mandatory=$true)]
  [string]
  $pxeserver,
  [Parameter(Mandatory=$true)]
  [string]
  $pxefile
)
Set-DhcpServerv4OptionValue -ScopeId $scope -OptionId 66 -Value $pxeserver
Set-DhcpServerv4OptionValue -ScopeId $scope -OptionId 67 -Value $pxefile
In Boltdir/site-modules/renfro/tasks/create_pxe_options.json, add:
{
  "puppet_task_version": 1,
  "supports_noop": false,
  "description": "Create DHCP options for PXE booting.",
  "parameters": {
    "scope": {
      "description": "The DHCP scope (network address).",
      "type": "String"
    },
    "pxeserver": {
      "description": "The PXE server's IP address.",
      "type": "String"
    },
    "pxefile": {
      "description": "The PXE boot file path (relative to the TFTP root).",
      "type": "String"
    }
  }
}
Run the task with:
bolt task run --targets dc renfro::create_pxe_options scope=192.168.1.0 pxeserver=192.168.1.2 pxefile=/pxelinux.0
and verify it set the options correctly by running:
bolt command run --targets dc "Get-DHCPServerv4OptionValue -scopeid 192.168.1.0"
Setting up Puppet on the Puppet Server
We could start with a simple Puppet installation, but we’d like to future-proof this as much as possible. To do this, we’ll implement the following during Puppet’s installation:
- Encrypted value storage in Hiera data using
hiera-eyaml r10kto deploy the Puppet manifests, modules, and Hiera data to a dynamic set of Puppet environments for production, feature development, etc.- Version control repositories for:
- general Puppet settings (repository name
puppet) - puppetserver settings (repository name
puppetserver) - Puppet client settings (manifests, modules, Hiera data, etc.) for each Puppet environment (repository name
puppet-control) - settings to deploy the Puppet client settings for each environment (repository name
r10k)
- general Puppet settings (repository name
- A roles and profiles architecture for settings applied to each host managed by Puppet.
Some of the repositories (puppet-control, especially) will be constantly changing, others (r10k, puppet) will change very infrequently.
Installing Puppet Packages
yum -y install https://yum.puppet.com/puppet6-release-el-7.noarch.rpm
yum -y install puppetserver
Log out and back in to update your PATH to include the basic Puppet binaries.
Installing hiera-eyaml and r10k
Both hiera-eyaml and r10k are distributed in Gem format.
Rather than modifying the system-wide Ruby environment, we’ll install these through Puppet’s internal gem utility.
puppetserver gem install r10k hiera-eyaml
Bootstrapping Version Control Repositories
First, we create the necessary repositories and working copies with:
for r in puppet puppetserver r10k ; do git init --shared=umask --bare /opt/gitrepos/${r}.git; git clone /opt/gitrepos/$r ~/$r; done
git init --shared=umask --bare /opt/gitrepos/puppet-control.git
git clone https://github.com/puppetlabs/control-repo.git ~/puppet-control
r10k Repository
The r10k repository only contains a single file, deployed into /etc/puppetlabs/r10k/r10k.yaml, with contents of:
---
cachedir: '/opt/puppetlabs/puppet/cache'
sources:
  blab.renf.ro:
    basedir: '/etc/puppetlabs/code/environments'
    remote: '/opt/gitrepos/puppet-control.git'
After creating the r10k.yaml file, add it to the staging area, commit it, and push it to the shared folder:
git add r10k.yaml
git commit -m 'Initial import'
git push -u origin master
Finally, clone the repository to the /etc/puppetlabs/r10k directory:
cd /etc/puppetlabs
git clone /opt/gitrepos/r10k.git
puppet Repository
We’ll import most of the /etc/puppetlabs/puppet hierarchy to this repository, and omit the /etc/puppetlabs/puppet/ssl folder.
cd ~/puppet
echo '!ssl/*' > .gitignore
cp -a /etc/puppetlabs/puppet/[a-p]* .
touch devices/.gitkeep
git add .gitignore auth.conf devices hiera.yaml puppet.conf
git commit -m 'Initial import'
git push -u origin master
Finally, clone the repository to the /etc/puppetlabs/puppet directory, retaining the original ssl folder:
cd /etc/puppetlabs
mv puppet puppet.orig
git clone /opt/gitrepos/puppet.git
cp -a puppet.orig/ssl puppet/
puppetserver Repository
We’ll import all of the /etc/puppetlabs/puppetserver hierarchy to this repository:
cd ~/puppetserver
cp -a /etc/puppetlabs/puppetserver/* .
git add conf.d logback.xml request-logging.xml services.d
git commit -m 'Initial import'
git push -u origin master
cd /etc/puppetlabs
mv puppetserver puppetserver.orig
git clone /opt/gitrepos/puppetserver.git
puppet-control Repository
The puppet-control repository will get a copy of Puppet’s canonical control repository instead of a clone of an empty repository that the others start with.
Following the instructions provided at their README:
cd ~/puppet-control
git remote remove origin
git remote add origin /opt/gitrepos/puppet-control.git
git push -u origin master:production
cd ..
rm -rf puppet-control
git clone /opt/gitrepos/puppet-control.git
cd puppet-control
git checkout production
we end up with a control repository where the production branch is the primary branch in the working copy.
r10k will clone each branch of this repository into separate folders under /etc/puppetlabs/code/environments.
Out of the box, /etc/puppetlabs/code/environments is owned by root, but we want to run r10k as the user puppet.
So we’ll initially set ownership of the /etc/puppetlab/code/environments folder to puppet, and then try an r10k run:
chown -R puppet:puppet /etc/puppetlabs/code/environments
mv /etc/puppetlabs/code/environments/production /etc/puppetlabs/code/environments/production.orig
(cd /tmp ; sudo -u puppet /opt/puppetlabs/bin/puppetserver ruby /opt/puppetlabs/server/data/puppetserver/jruby-gems/bin/r10k deploy environment -p)
When done, you should see the contents of the puppet-control repository’s production branch in /etc/puppetlabs/code/environments/production with an additional file .r10k-deploy.json.
Finally, we can test that the puppet server gets a valid configuration from the production branch of the puppet-control repository by running
puppet agent -t
as root.
Applying a Roles and Profiles Structure to the Puppet Server
The roles and profiles method requires:
- a node includes one role class,
- the node’s role class includes one or more profile classes,
- the profile classes include one or more dependent profile classes or component modules
We’ll look up the role class using Hiera, so we’ll edit the node default section of manifests/site.pp in the puppet-control repository to include:
# https://rnelson0.com/2019/12/24/updating-puppet-classification-with-hiera-to-use-the-modern-lookup-command/
# Find the first instance of `classes` in hiera data and includes unique values. Does not merge results.
$classes = lookup('classes', Variant[String,Array[String]])
case $classes {
  String[1]: {
    include $classes
  }
  Array[String[1],1]: {
    $classes.unique.include
  }
  default: {
    fail('This node did not receive any classification')
  }
}
and the data/common.yaml to include:
classes:
  - role::example
and re-deploy this to the server with a combination of git add, git commit, git push, and the r10k command from the previous section.
The default example role includes no other classes or resources, so it will make no changes to the server.
Running
puppet agent -t
should return a valid configuration, but make no changes.
Defining a Roles and Profiles Structure for Kickstart
To start doing automated host instllations (which long ago was the goal of this post), we’d like to have the ability to use a Kickstart server. A standalone Kickstart server needs:
- a running TFTP service
- a
pxelinux.0boot file stored in the TFTP folder structure - one or more boot configuration files stored in a
pxelinux.cfgfolder in the TFTP folder structure - a running HTTP service
- a Kickstart configuration file accessible over HTTP
So our intended role::kickstart role will directly include a profile::kickstart profile, and that profile will include:
- the puppet/pxe module and its dependencies (puppetlabs/tftp, puppetlabs/xinetd, puppetlabs/concat, puppetlabs/stdlib)
- the puppet/nginx module and its dependencies (just puppetlabs/concat and puppetlabs/stdlib, already included from the puppet/pxe module)
Installing Component Modules
To get all the necessary modules, we’ll add the following to the Puppetfile in the puppet-control repository:
mod 'puppetlabs-stdlib',  '6.3.0'
mod 'puppetlabs-concat',  '6.2.0'
mod 'puppetlabs-translate', '2.2.0'
mod 'puppet-nginx', '1.1.0'
mod 'puppetlabs-tftp', '1.0.0'
mod 'puppetlabs-xinetd', '3.3.0'
mod 'puppet-archive', '4.5.0'
#mod 'puppet-pxe', '2.0.0'
mod 'pxe',
  git: 'https://github.com/mikerenfro/puppet-pxe.git',
  branch: 'feature-use-archive'
At the moment, I have a couple of bug fixes merged into my Github fork for the pxe module that haven’t made it into an official tagged release.
And those bug fixes depend on the puppet-archive module, so that added an extra dependency.
Once those fixes are officially released, I’ll comment out the git version of the module and use the updated release from Puppet Forge.
Populating the Structure
In data/nodes/puppet.blab.renf.ro.yaml, add:
---
classes:
  - role::kickstart
In site-modules/role/manifests/kickstart.pp, add:
class role::kickstart {
  include 'profile::kickstart'
}
In site-modules/profile/manifests/kickstart.pp, add:
class profile::kickstart {

}
and after pushing the changes to the git repository, running r10k, and running puppet agent -t, you should get a valid blank configuration applied.
Adding Resources to the Structure
The pxe module will default to placing TFTP content in /srv/tftp, while the default for Red Hat and CentOS systems is /var/lib/tftpboot.
The module will read settings from Hiera data files, so we’ll adjust the Hiera settings to look for OS-family level settings.
That way, we can set the TFTP default for all Red Hat and CentOS systems in one location.
In hiera.yaml in the puppet-control repository, add:
- "osfamily/%{::facts.os.family}.yaml"
between the "nodes" and "common" lines.
Add a file data/osfamily/RedHat.yaml with contents of:
pxe::tftp_root: "/var/lib/tftpboot"
Add edit site-modules/profile/manifests/kickstart.pp to read:
class profile::kickstart {
  class { 'tftp': }
  class { 'pxe': }
}
After pushing changes and running r10k, a puppet agent -t run should populate the /var/lib/tftpboot folder and install the tftpd-server package.
We need to enable the tftp service through the host firewall, so add the puppet-firewalld module to the Puppetfile:
mod 'puppet-firewalld', '4.3.0'
add the firewalld class to the kickstart profile:
class { 'firewalld': }
and add a firewall service to the puppet server’s Hiera data:
firewalld::services:
  'Allow TFTP from the public zone':
    ensure: present
    service: tftp
    zone: public
On pushing and deploying the new puppet-control repository, a firewall rule allowing tftp should be created.
Next we’ll add PXE files needed to install an OS.
In the profile::kickstart class, include:
$centos_architectures = ['x86_64',]
$centos_versions = ['7',]

$centos_versions.each |$ver| {
  $os = 'centos'
  $centos_architectures.each |$arch| {
    pxe::installer { "${os}_${ver}_${arch}":
      arch   => $arch,
      ver    => $ver,
      os     => $os,
      file   => "os_${os}",
      kernel => "images/${os}/${ver}/${arch}/vmlinuz",
      append => "initrd=images/${os}/${ver}/${arch}/initrd.img inst.repo=https://mirrors.kernel.org/centos/7/os/x86_64/",
    }
  }
}
On pushing changes and running r10k, a puppet agent -t run should further populate /var/lib/tftpboot with a CentOS 7 kernel and initial ramdisk, a menu_install file, and an os_centos file.
Testing an Interactive PXE Boot
Build a VM large enough to run CentOS (maybe 2 CPUs, 4 GB RAM, and 16 GB thin-provisioned disk), and record its MAC address. Don’t assign it any optical boot media. Assuming that IP 192.168.1.4 is available, run a bolt plan to provision a DHCP reservation and a DNS name:
bolt plan run renfro::provision_dhcp_dns dc=dc hostname=boot domain=blab.renf.ro ip=192.168.1.4 mac=00:50:56:00:22:44 scope=192.168.1.0
Boot the VM, and you should be presented with a PXE menu from the puppet server.
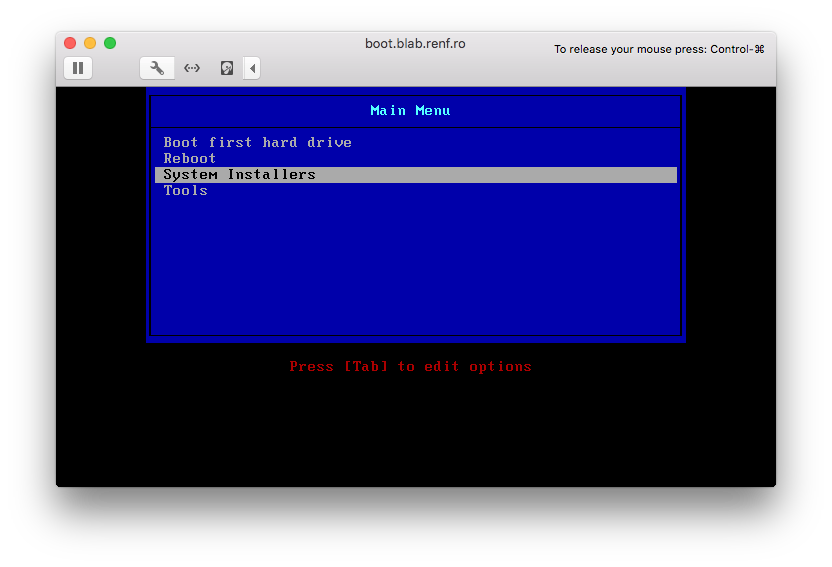
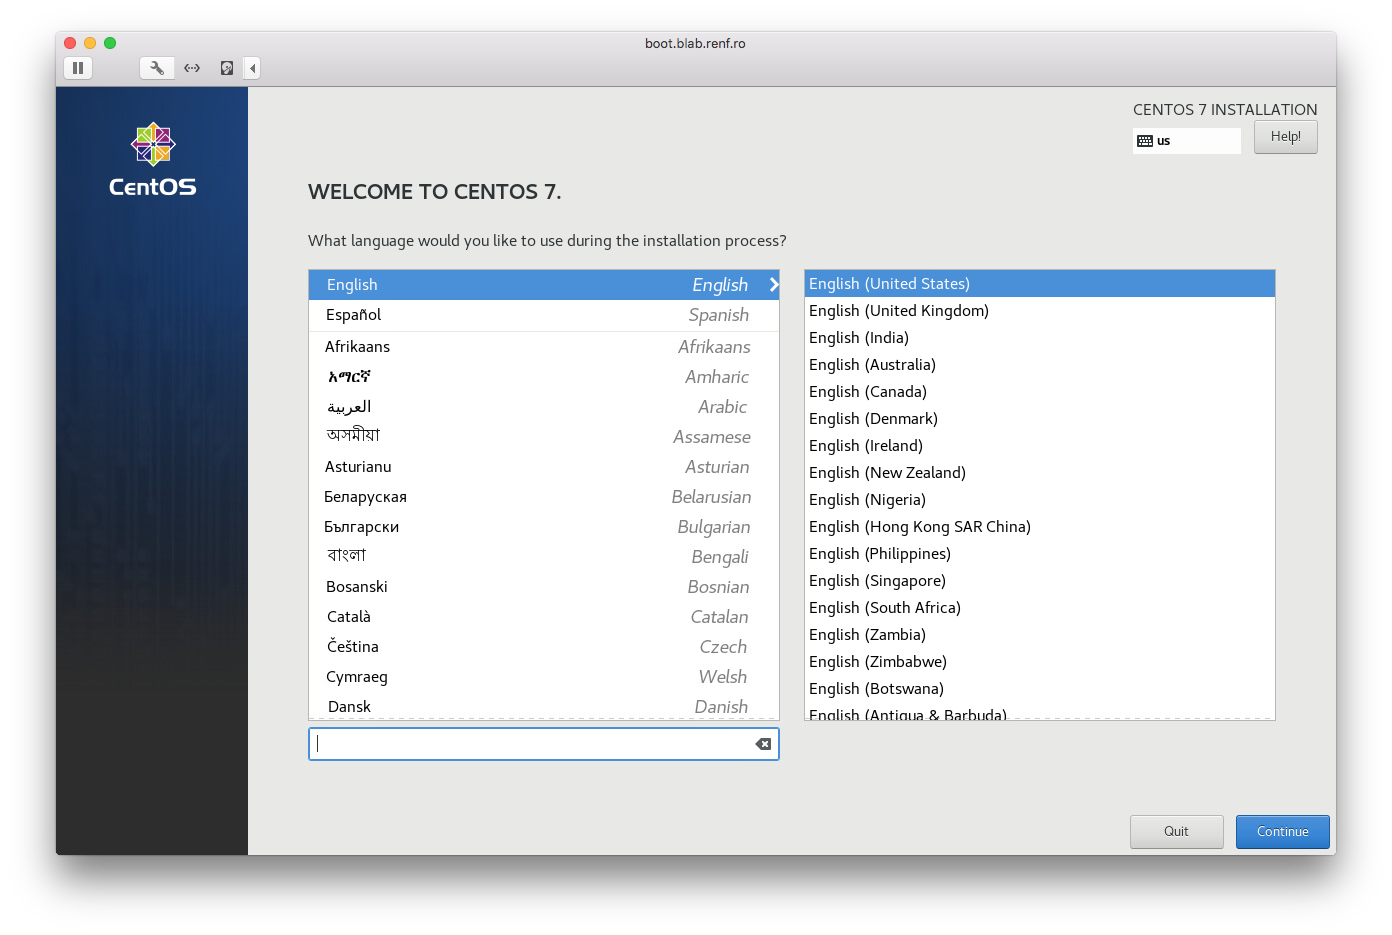
After selecting the System Installers, Centos, and centos 7 x86_64 menus, the standard CentOS graphical installer should start.
Publishing a Kickstart File for Unattended Installations
The last part in the unattended installation process is creating a Kickstart file and making it available over http.
We’ll start with setting up the nginx module for the Kickstart host.
Add the nginx class to the kickstart profile class:
class { 'nginx': }
And add Hiera data to data/nodes/puppet.blab.renf.ro.yaml.
First the data for an nginx static server:
nginx::resource::server:
  "%{::fqdn}":
    www_root: /usr/share/nginx/html
and an extra entry to firewalld::services:
  'Allow HTTP from the public zone':
    ensure: present
    service: http
    zone: public
At this point after applying the new configuration, curl http://localhost/ should return the deafult nginx homepage.
Next, to manage the Kickstart configuration file, we’ll use the danzilio/kickstart module.
The 0.4.0 release requires a minor update to match the current version of the stdlib module, so we’ll use the upstream Git repository instead.
Add:
mod 'kickstart',
  git: 'https://github.com/danzilio/puppet-kickstart.git',
  commit: '62f5918e8b605a711488ffc3a428c4aaa9d9b915'
to Puppetfile.
The final Kickstart file will contain command like:
lang en_US.UTF-8
keyboard us
text
auth --enableshadow --passalgo=sha512
rootpw --iscrypted $6$some_long_hash
clearpart --all
zerombr
part / --fstype xfs --size 1 --grow
part swap --fstype swap --size 2048
reboot
services --enabled="chronyd"
network --bootproto=dhcp --device=link --ipv6=auto --activate
bootloader --append=" crashkernel=auto" --location=mbr --boot-drive=sda

%packages
@^minimal
@core
chrony
kexec-tools
-iwl*
%end
We don’t want to expose the root password hash anywhere we don’t have to, including the version control repository.
So we’ll use hiera-eyaml to encrypt the hash contents before committing it, and to decrypt the hash contents on deployment through r10k.
We’ve already installed hiera-eyaml, so we just need to configure it.
Create new keys under root’s home directory with:
cd ; /opt/puppetlabs/puppet/bin/eyaml createkeys
We’ll first copy the keys to a .eyaml folder with:
mkdir ~/.eyaml
cp ~/keys/*.pem ~/.eyaml
and create a file ~/.eyaml/config.yaml containing:
---
pkcs7_private_key: '/root/.eyaml/private_key.pkcs7.pem'
pkcs7_public_key: '/root/.eyaml/public_key.pkcs7.pem'
Then we’ll copy those keys to where puppet can use them with:
mkdir /etc/puppetlabs/puppet/eyaml
cp ~/keys/*.pem /etc/puppetlabs/puppet/eyaml
chown -R root:puppet /etc/puppetlabs/puppet/eyaml
chmod -R 750 /etc/puppetlabs/puppet/eyaml
and set up an encrypted Hiera backend by editing the hiera.yaml file in the puppet-control repository.
Place the following ahead of the original data backend:
- name: Eyaml backend"
  lookup_key: eyaml_lookup_key
  paths:
    - "secrets/nodes/%{trusted.certname}.eyaml"
    - "secrets/osfamily/%{::facts.os.family}.eyaml"
    - "secrets/common.eyaml"
  options:
    pkcs7_private_key: /etc/puppetlabs/puppet/eyaml/private_key.pkcs7.pem
    pkcs7_public_key: /etc/puppetlabs/puppet/eyaml/public_key.pkcs7.pem
Create the data/secrets folder, and edit data/secrets/common.eyaml with:
/opt/puppetlabs/puppet/bin/eyaml edit data/secrets/common.eyaml
Add the following lines:
lookup_options:
  '^profile::.+::sensitive_\w+$':
    convert_to: "Sensitive"

profile::kickstart::sensitive_root_sha512_hash: DEC::PKCS7[]!
and insert the root password hash from /etc/shadow between the brackets.
After saving the file and exiting, if you view the contents with cat or other tools, you’ll see encrypted data between the brackets like:
ENC[PKCS7,MIIB2gYJKoZIhvcNAQcDoIIByzCCAccCAQAxggEhMIIBHQIBADAFMAACAQEwDQYJKoZIhvcNAQEBBQAEggEAqw/7QK6aGNi3yrce2jde6GmNKsU7tBbTk0miWY/VNojiuArRUeo0p4OGHWr1DFnrNKqTf5sprf/jsrCba2+GC3nxm+ZntZWFIiQ8FQ8n0cDl67zMqbI2/19ZOk2Xy5QZDPcw2EAtOHMD65CvE6LPLB8yAroiO47JxcQWjGFvRnZ+EYH2RaWBFqgyz1PCj12FVD6vTT54n03YbbKTpkIxyqYvZh5WdK2s7oQhSabDWlVEYpl/9WQ0AXQ3+lSec5d4sE4vQVxqNtG/AFY/oT9lE2MgFnsfHgHJ+TmdEDqbrCrbuiM2lUIZzR/+YfE4lRwoGjtoKA0JYpny9pRapMw26TCBnAYJKoZIhvcNAQcBMB0GCWCGSAFlAwQBKgQQdZEznBBL+5cWSs+2h3faPYBwbZqq+Hj5prQedctn8YQmH+tdzBAG24z4fJLUuotdeiTd1QYqp+azPgcRKm2EbfECEZb84hEHfUhNmogz232qDwmDg5JvnV/g+7J3EV2rorlRXBQT9Tb1BYMU8zkXYPeR1KPCCgC5drb25bP05NOv3g==]
but if you view the contents with the eyaml edit command, you’ll see the original contents.
The lookup_options section automatically converts any Hiera variables matching the expression ^profile::.+::sensitive_\w+$ to a Sensitive data type, indicating they should be redacted from various plain-text logging output.
Now we’ll insert the original contents into the puppet code controlling the contents of the Kickstart configuration file.
One current limitation of Puppet documented in PUP-8969 is that if we want to redact sensitive information like the password hash from logs and diff output, we have to redact it on a file-by-file basis.
That is, we’ll need to put the password hash into its own file and include it from the main Kickstart configuration file.
Otherwise, all the Kickstart configuration changes would be redacted and more difficult to track.
We’ll adjust the profile::kickstart class to use automatic parameter lookup to find the password hash by adding (Sensitive[String[1]] $sensitive_root_sha512_hash,) to its signature.
After implementing all the above changes, the kickstart.pp file should read:
class profile::kickstart (
  Sensitive[String[1]] $sensitive_root_sha512_hash,
) {
  class { 'firewalld': }
  class { 'tftp': }
  class { 'pxe': }
  class { 'nginx': }
  $centos_architectures = ['x86_64',]
  $centos_versions = ['7',]

  $centos_versions.each |$ver| {
    $os = 'centos'
    $centos_architectures.each |$arch| {
      pxe::installer { "${os}_${ver}_${arch}":
        arch   => $arch,
        ver    => $ver,
        os     => $os,
        file   => "os_${os}",
        kernel => "images/${os}/${ver}/${arch}/vmlinuz",
        append => "initrd=images/${os}/${ver}/${arch}/initrd.img inst.repo=https://mirrors.kernel.org/centos/7/os/x86_64/",
      }
    }
  }
  kickstart { '/usr/share/nginx/html/ks.cfg':
    commands => {
      'lang'       => 'en_US.UTF-8',
      'keyboard'   => 'us',
      'text'       => true,
      'install'    => true,
      'reboot'     => true,
      'skipx'      => true,
      'url'        => '--url https://mirrors.kernel.org/centos/7/os/x86_64/',
      'auth'       => '--enableshadow --passalgo=sha512',
      '%include'   => 'rootpw-sha512-hash.cfg',
      'services'   => '--enabled="chronyd"',
      'network'    => '--bootproto=dhcp --device=link --ipv6=auto --activate',
      'bootloader' => '--location=mbr --boot-drive=sda',
    },
    partition_configuration => {
      zerombr => 'yes',
      clearpart => '--all',
      part      => [
        '/ --fstype xfs --size 1 --grow',
        'swap --fstype swap --size 2048',
      ],
    },
    packages => [
      '@^minimal',
      '@core',
      'chrony',
      'kexec-tools',
      '-iwl*',
    ],
  }
  file { '/usr/share/nginx/html/root-sha512-hash.cfg':
    ensure  => present,
    owner   => 'root',
    group   => 'nginx',
    mode    => '0640',
    content => Sensitive(template('profile/rootpw-sha512-hash.erb')),
  }
}
and a file site-modules/profile/templates/rootpw-sha512-hash.erb should contain:
rootpw --iscrypted <%= scope.call_function('unwrap', [@sensitive_root_sha512_hash]) -%>
After deploying the new files with r10k and running puppet agent -t, you should see a Kickstart file in /usr/share/nginx/html/ks.cfg with contents of:
### THIS FILE WAS GENERATED BY PUPPET ###

# Command Section
lang en_US.UTF-8
keyboard us
text
install
reboot
skipx
url --url https://mirrors.kernel.org/centos/7/os/x86_64/
auth --enableshadow --passalgo=sha512
%include rootpw-sha512-hash.cfg
services --enabled="chronyd"
network --bootproto=dhcp --device=link --ipv6=auto --activate
bootloader --location=mbr --boot-drive=sda


# Partition Configuration
zerombr yes
clearpart --all
part / --fstype xfs --size 1 --grow
part swap --fstype swap --size 2048

# Packages Section
%packages
@^minimal
@core
chrony
kexec-tools
-iwl*
%end
and a second file /usr/share/nginx/html/rootpw-sha512-hash.cfg with contents of:
rootpw --iscrypted $6$some_long_hash
where $6$some_long_hash is the value of the root password hash from /etc/shadow.
Creating a Kickstart PXE Configuration for a New Host
Finally, we’ll set up PXE configuration files to automatically boot a specific new host into a CentOS 7 Kickstart procedure.
For that, we’ll use the pxe module’s pxe::menu::entry class:
pxe::menu::host { "01-00-50-56-00-22-44": # boot.blab.renf.ro
  kernel  => "images/centos/7/x86_64/vmlinuz",
  append  => "initrd=images/centos/7/x86_64/initrd.img ks=http://${::networking['fqdn']}/ks.cfg",
}
Don’t forget to add the 01- ahead of the host’s MAC address in the filename as shown at PXELINUX’s Configuration section.
Once this has been deployed, you should see a file /var/lib/tftpboot/pxelinux.cfg/01-00-50-56-00-22-44 containing:
LABEL boot.blab.renf.ro
  KERNEL images/centos/7/x86_64/vmlinuz
  APPEND initrd=images/centos/7/x86_64/initrd.img ks=http://puppet.blab.renf.ro/ks.cfg
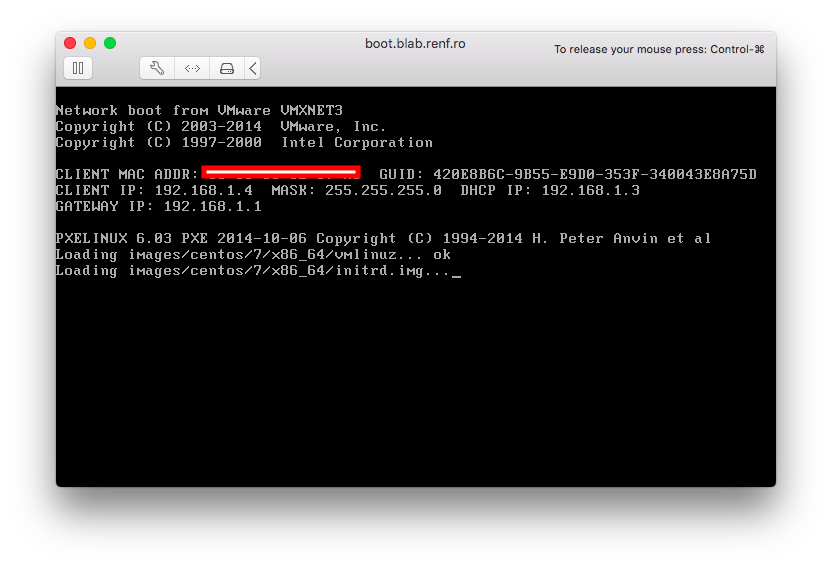
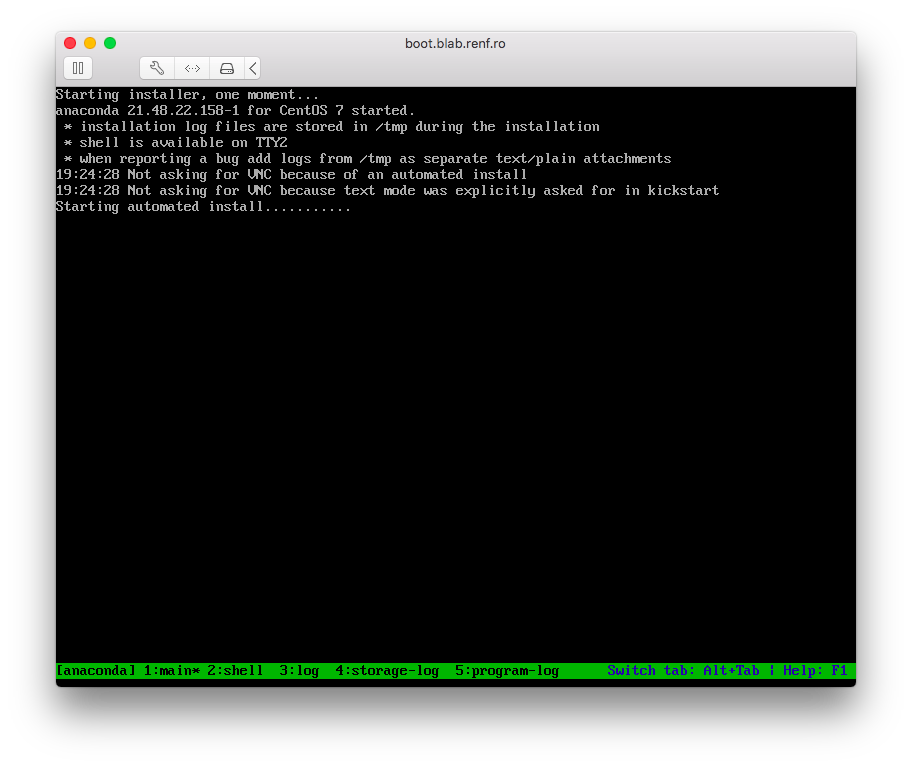
And on booting the associated host over PXE, you should get an automated Kickstart install, and the resulting system will have a known root password.
Improvements to the Kickstart Profile
A few improvements can be made to the profile structure:
- Making a variable for the CentOS repository used in the
appendparameters and the--urlKickstart command - Iterating over an array of MAC addresses to build the host-specific unattended installation files
The first improvement can be made by creating a Hiera variable profile::kickstart::repo in data/common.yaml:
profile::kickstart::repo: https://mirrors.kernel.org/centos/7/os/x86_64/
adding a $url parameter to the class definition, and using the $url parameter in the class manifest.
Additionally, it would be helpful to ensure that puppet-agent is installed and enabled on new hosts automatically.
We can do that by adding three commands to the %post section of the final Kickstart configuration file:
rpm -Uvh https://yum.puppet.com/puppet6-release-el-7.noarch.rpm
yum -y install puppet-agent
systemctl enable puppet
An alternative is to add an extra repo --install command to the main set of Kickstart commands, add puppet-agent to the list of packages, and keep the systemctl enable puppet in the %post commands, but repositories installed with repo don’t get GPG keys by default, and will throw errors on later yum install commands until they’re fixed.
To make these changes through Puppet, add a fragments hash containing a list of templates to insert into the %pre or%post` sections of the Kickstart file:
    fragments => {
      'post' => [
        'profile/provision-puppet-agent.erb',
      ],
These templates need to be installed in the site-modules/profile/templates folder.
They don’t need to contain any template tags, so the three lines given above (rpm, yum, systemctl) are enough.
The final Kickstart profile looks like:
class profile::kickstart (
  Sensitive[String[1]] $sensitive_root_sha512_hash,
  $repo,
) {
  class { 'firewalld': }
  class { 'tftp': }
  class { 'pxe': }
  class { 'nginx': }
  $centos_architectures = ['x86_64',]
  $centos_versions = ['7',]

  $centos_7_x86_64_hosts = [
    "00-50-56-8e-87-a5", # boot.blab.renf.ro
  ]
  $centos_7_x86_64_hosts.each |$mac| {
    pxe::menu::host { "01-${mac}":
      kernel  => "images/centos/7/x86_64/vmlinuz",
      append  => "initrd=images/centos/7/x86_64/initrd.img ks=http://${::networking['fqdn']}/ks.cfg",
    }
  }

  $centos_versions.each |$ver| {
    $os = 'centos'
    $centos_architectures.each |$arch| {
      pxe::installer { "${os}_${ver}_${arch}":
        arch   => $arch,
        ver    => $ver,
        os     => $os,
        file   => "os_${os}",
        kernel => "images/${os}/${ver}/${arch}/vmlinuz",
        append => "initrd=images/${os}/${ver}/${arch}/initrd.img inst.repo=${repo}",
      }
    }
  }
  kickstart { '/usr/share/nginx/html/ks.cfg':
    commands => {
      'lang'       => 'en_US.UTF-8',
      'keyboard'   => 'us',
      'timezone'   => 'America/Chicago',
      'text'       => true,
      'install'    => true,
      'reboot'     => true,
      'skipx'      => true,
      'url'        => "--url ${repo}",
      'auth'       => '--enableshadow --passalgo=sha512',
      '%include'   => "http://${::networking['fqdn']}/rootpw-sha512-hash.cfg",
      'services'   => '--enabled="chronyd"',
      'network'    => '--bootproto=dhcp --device=link --ipv6=auto --activate',
      'bootloader' => '--location=mbr --boot-drive=sda',
    },
    partition_configuration => {
      zerombr   => true,
      clearpart => '--all',
      part      => [
        '/ --fstype xfs --size 1 --grow',
        'swap --fstype swap --size 2048',
      ],
    },
    packages => [
      '@^minimal',
      '@core',
      'chrony',
      'kexec-tools',
      '-iwl*',
    ],
    fragments => {
      'post' => [
        'profile/provision-puppet-agent.erb',
      ],
    },
  }
  file { '/usr/share/nginx/html/rootpw-sha512-hash.cfg':
    ensure  => present,
    owner   => 'root',
    group   => 'root',
    mode    => '0644',
    content => Sensitive(template('profile/rootpw-sha512-hash.erb')),
  }
}
Testing the Host Install Tools by Building a New Kickstart Server
So far, we’ve had the Puppet server playing two roles: first, as a host running puppetserver, and second as a Kickstart server.
Let’s migrate the Kickstart duties to a new server so we can return the Puppet server to its original intended use.
Start by rebooting and reinstalling the boot.blab.renf.ro host to verify that it gets puppet-agent installed and enabled.
If you run systemctl status puppet or check /var/log/messages on the new host, you’ll probably see error messages like:
May  9 18:43:10 boot puppet-agent[897]: Request to https://puppet:8140/puppet-ca/v1 failed after 0.008 seconds: Failed to open TCP connection to puppet:8140 (No route to host - connect(2) for "puppet" port 8140)
May  9 18:43:10 boot puppet-agent[897]: Wrapped exception:
May  9 18:43:10 boot puppet-agent[897]: Failed to open TCP connection to puppet:8140 (No route to host - connect(2) for "puppet" port 8140)
May  9 18:43:10 boot puppet-agent[897]: No more routes to ca
which is caused by a missing firewall rule on the Puppet server.
Add that firewall rule to the Puppet server by editing its puppet.blab.renf.ro.yaml Hiera file to include:
'Allow Puppet from the public zone':
  ensure: present
  service: puppetmaster
  zone: public
in its firewalld::services: settings and re-deploying its settings with r10k and puppet agent.
Once the firewall rules are in place, puppet agent on the new host will get a new message (you can restart the puppet service to make this happen more quickly):
May 9 18:49:56 boot puppet: Couldn't fetch certificate from CA server; you might still need to sign this agent's certificate (boot.blab.renf.ro).
indicating that you need to sign the new host’s certificate before it can be managed by Puppet.
Run puppetserver ca sign --certname boot.blab.renf.ro on the Puppet server to sign the new host’s certificate request.
On a restart of the puppet service on the new host, or a short period of time, the new host will finally start applying settings from the Puppet server:
May  9 18:49:59 boot puppet-agent[8714]: (/File[/opt/puppetlabs/puppet/cache/facts.d]/mode) mode changed '0755' to '0750'
...
No real changes are made, since the new host only has the role::example class applied (defined in data/common.yaml), which is empty.
Configure the new host to be a kickstart server by creating a Hiera file data/nodes/boot.blab.renf.ro.yaml containing:
    ---
    classes:
      - role::kickstart
    firewalld::services:
      'Allow TFTP from the public zone':
        ensure: present
        service: tftp
        zone: public
      'Allow HTTP from the public zone':
        ensure: present
        service: http
        zone: public
    nginx::resource::server:
      "%{::fqdn}":
        www_root: /usr/share/nginx/html
and redeploy the settings with r10k and puppet agent on the Puppet server.
By default, puppet agent will check in with the Puppet server every 30 minutes.
You can force it to check for changes by running the puppet agent -t command manually.
In either case, you should see the new host starting to apply changes.
When finished, you should have a working Kickstart server on the new host, including:
tftpandhttpfirewall rules enabled on the public zoneks.cfgandrootpw-sha512-hash.cfgfiles in/usr/share/nginx/html- services listening on both
tftpandhttpports (as seen fromss -l) - a directory tree of CentOS, syslinux, and memtest86+ media in
/var/lib/tftpboot
Build another virtual machine on the lab network and record its MAC address. Provision its DHCP reservation and DNS name with:
bolt plan run renfro::provision_dhcp_dns dc=dc hostname=code domain=blab.renf.ro ip=192.168.1.5 mac=00:50:56:00:22:66 scope=192.168.1.0
and change the lab’s DHCP options to point to the new boot server with:
bolt task run --targets dc renfro::create_pxe_options scope=192.168.1.0 pxeserver=192.168.1.4 pxefile=/pxelinux.0
Finally, ensure the new host defaults to a Kickstart install by adding it to the $centos_7_x86_64_hosts array of MAC addresses in site-modules/profile/manifests/kickstart.pp and redeploying the changes with r10k on the Puppet server, and puppet agent -t on boot.blab.renf.ro.
Once the new host has booted, sign its certificate on the Puppet server, and it should be able to apply a blank configuration through puppet agent.
Cleaning Up the Puppet Server’s Roles
Now that the Puppet server doesn’t have to play two roles, we can adjust its roles and profiles down to ones relevant to running the puppetserver service.
That requires adjusting the puppet.blab.renf.ro.yaml Hiera file to assign the role::puppetserver class and remove the Kickstart-related firewall rules, creating site-modules/role/manifests/puppetserver.pp to include:
class role::puppetserver {
  include 'profile::puppetserver'
}
and creating site-modules/profile/manifests/puppetserver.pp to include:
class profile::puppetserver {
  class { 'firewalld': }
}
On redploying with r10k and rerunning puppet agent -t on the Puppet server, we see no changes applied.
No firewall rules were removed, no packages removed, etc.
Rather than rebuild the puppet server entirely, we’ll revert the few Kickstart-related settings:
for s in http tftp ; do firewall-cmd --remove-service=${s} --zone=public --permanent; done
systemctl restart firewalld
yum remove nginx tftp-server xinetd
rm -rf /etc/nginx /usr/share/nginx /var/lib/tftpboot /etc/xinetd.*
We’ll add some other resources to the profile::puppetserver class later.